목차
- 문의 사항
- 1. Dark/Light 버튼 위치 변경
- 2. 포스팅 날짜 및 시간 정보 추가
- 3. .md 파일 내 게시 날짜와 실제 날짜가 같으면 게시글이 사라지는 문제
- 4. 시간 내림차순 정렬
- 후기
블로그 테마로 Cupper를 선택했다.
기본 세팅에서 네 가지 고치고 싶은 사항이 있어 Hugo Forum에 문의했다.
문의 사항
Four issues about the cupper theme (dark button, posting time, and an error)
I am building a static website using the Cupper theme (https://github.com/zwbetz-gh/cupper-hugo-theme).
I have four issues:
- How can I move the position of dark/light button?
The button is currently located at the bottom of a post. However, I think the readers should be allowed to change between the dark/light scene before they start to read. Therefore I want to move the button to the bottom of the left part of the theme. - How can I add more information about posting time on the blog page and in each writing?
The cupper theme currently lists up the postings on the blog page, only with the titles. I want to have more information on the page (posting date and time). Also, in each writing, the theme provides the posting date (e.g. 2019-12-28). However, I want to add up the posting time information (e.g. 2019-12-28 14:24:49). - Why the posting disappears on the blog and tag pages when I set the “date” and “publishdate” parameters of the front matter of each posting as that of today?
For example, let’s say I am posting AA on 2019-12-29. When I set the “date” (or “publishdate”) parameter as 2019-12-28 and build the site locally (hugo server), I can see my post and related tags on the blog and tags pages. However, when I reset the “date” (or “publishdate”) parameter as “2019-12-29” and after the local server automatically updates the change, my posting AA has disappeared from the blog and tags pages. - Reordering the list of posts in order of the latest.
On the blog page, the oldest post is shown at the top. I want to reverse this rule (i.e. recent posts are on the top and old posts are at the bottom).
Thank you
@zwbetz
요약하면,
- Dark/Light 버튼 위치 변경: 각 게시글의 맨 밑이 아니라 왼쪽 메뉴 맨 아래로 이동해서 언제나 눈에 띄도록 하고 싶다.
- 포스팅 날짜 및 시간 정보 추가: Blog 버튼을 클릭하면 각 게시글 제목만 쭉 나열된다. 여기에 포스팅 날짜 정보도 추가하고 싶다. 그리고 각 게시글을 열면 게시 날짜가 yyyy-mm-dd 형식으로 나타나는데, 여기에도 시간 정보를 추가하고 싶다.
- md 파일 내 게시 날짜와 실제 날짜가 같으면 게시글이 사라지는 문제: 아마 포스팅 날짜가 yyyy-mm-dd 형식이다보니 그런 듯.
- 시간 내림차순 정렬: Blog 버튼 클릭하면 시간 오름차순으로 게시글이 정렬된다. 내림차순으로 바꾸고 싶다.
Theme 저자인 zwbetz이 답변을 해줬다.
1. Dark/Light 버튼 위치 변경
답변: footer.html 수정
.\themes\cupper-hugo-theme\layouts\partials\footer.html에서 div로 둘러싸인 부분을 내가 원하는 곳으로 복붙하기. 아마 nav로 옮기면 될 거라 한다.
footer.html 파일을 보면…
<footer role="contentinfo">

# 여기부터
  <div>
    <label for="themer">
      dark theme: <input type="checkbox" id="themer" class="vh">
      <span aria-hidden="true"></span>
    </label>
  </div>
# 여기까지

  {{ with .Site.Params.footer }}
    {{ . | markdownify }}
  {{ end }}
</footer>
nav.html 파일을 보면…
<nav id="patterns-nav" class="patterns" role="navigation">
<h2 class="vh">Main navigation</h2>
<button id="menu-button" aria-expanded="false">
<svg viewBox="0 0 50 50" aria-hidden="true" focusable="false">
<use xlink:href="#menu"></use>
</svg>
Menu
</button>
{{ $current := . }}
<ul id="patterns-list">
{{ range .Site.Menus.nav }}
<li class="pattern">
{{ $active := or ($current.IsMenuCurrent "nav" .) ($current.HasMenuCurrent "nav" .) }}
{{ $active = or $active (eq .Name $current.Title) }}
{{ $active = or $active (and (eq .Name "Blog") (eq $current.Section "post")) }}
{{ $active = or $active (and (eq .Name "Tags") (eq $current.Section "tags")) }}
<a href="{{ .URL }}" {{ if $active }}aria-current="page"{{ end }}>
<svg class="bookmark-icon" aria-hidden="true" focusable="false" viewBox="0 0 40 50">
<use xlink:href="#bookmark"></use>
</svg>
<span class="text">{{ .Name }}</span>
</a>
</li>
{{ end }}
</ul>
<!-- 여기부터 -->
<!-- 너무 메뉴 버튼에 딱 붙어 있어서 한 줄 띄었다. -->
<div>
<label for="themer">
dark theme: <input type="checkbox" id="themer" class="vh">
<span aria-hidden="true"></span>
</label>
</div>
<!-- 여기까지 -->
</nav>
결과
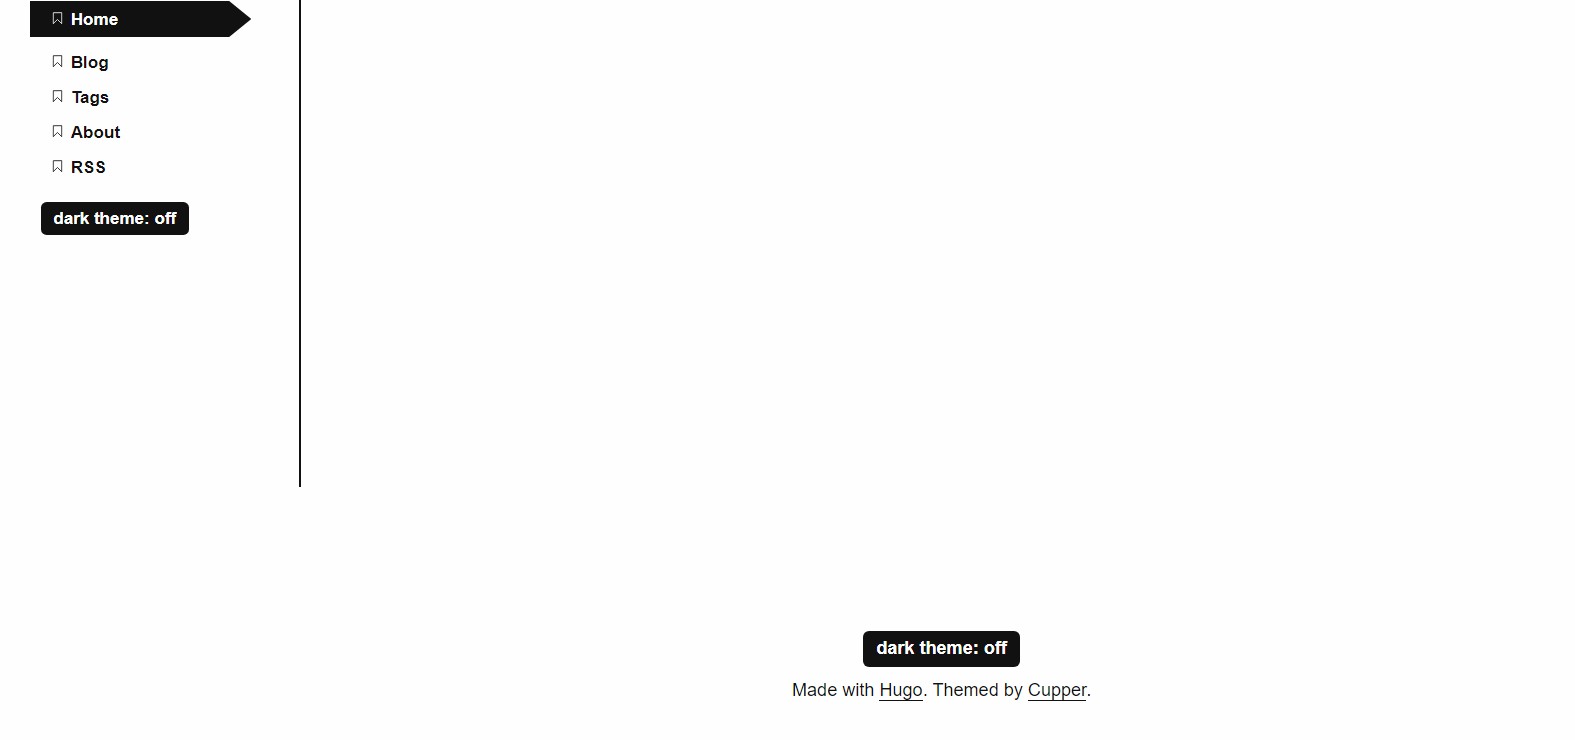
왼쪽에도 dark/light 버튼이 생겼다.
원래 맨 아래에 만들고 싶었으나 html은 잘 모르므로 이정도로 만족.
기존 footer.html에 있던 버튼을 지워주면 끝.
2. 포스팅 날짜 및 시간 정보 추가
답변: list.html과 single.html을 수정
게시글 목록은 .\themes\cupper-hugo-theme\layouts\_default\list.html, 각 게시글은 .\themes\cupper-hugo-theme\layouts\post\single.html을 보면 된다. Date/Time 포맷은 Hugo 문서를 참고하라고 한다.
게시글 목록에 날짜 추가, 오름차순 정렬
Hugo 문서 를 보면,
Front matter에서 사용하는 .PublishDate, .Date, .Lastmod의 표현 형식은 .Format으로 정할 수 있다고 한다.
현재 Blog 페이지는 아래처럼 생겼고
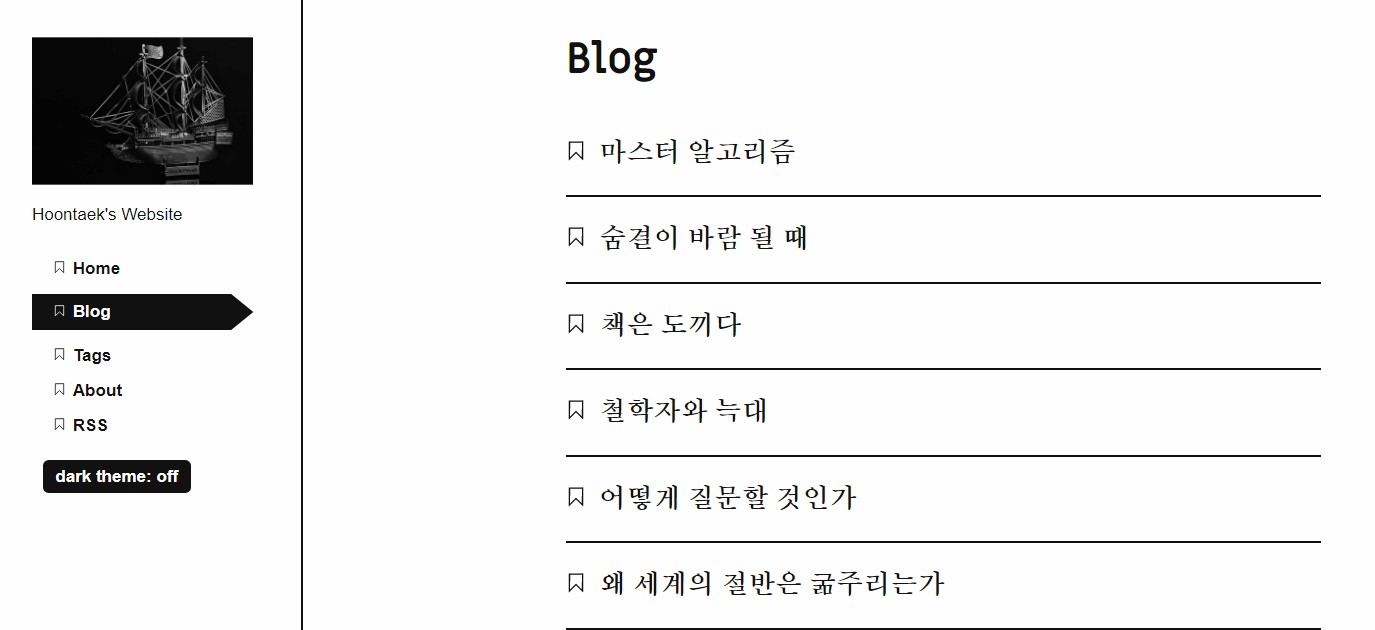
list.html은 아래처럼 생겼다.
{{ define "main" }}
  <main id="main">
    <h1>{{ .Title }}</h1>
    <ul class="patterns-list">
    {{ range .Pages.ByPublishDate.Reverse }}
      <li>
        <h2>
          <a href="{{ .Permalink }}">
            <svg class="bookmark" aria-hidden="true" viewBox="0 0 40 50" focusable="false">
              <use xlink:href="#bookmark"></use>
            </svg>
            {{ .Title }}
          </a>
        </h2>
      </li>
    {{ end }}
    </ul>
  </main>
{{ end }}
코드를 보면…
<h2> 밑에 .Permalink가 있고 바로 아랫줄에 "bookmark"라고 돼 있다. 아마 이게 각 글 제목 왼쪽에 있는 북마크 링크인 듯하다.
그리고 </a> 바로 위에 {{ .Title }}이 있는데, 이게 게시글 제목인 듯하다. 아마 여기에 날짜 정보를 추가해주면 될 것 같다.
작성 날짜(Date), 게시 날짜(PublishDate), 최종 수정 날짜(Lastmod) 중 무엇을 기준으로 할까. 블로그 활동 입장에서 날짜를 정렬하는 게 좋을 듯하다. 하지만 지금과 같이 과거에 작성해놓은 글을 옮기는 와중에는 며칠간 포스팅 날짜가 집중될 것이다. 이 날짜보다는 내가 언제 그 글을 쓰는 활동을 했는지 조망하는 게 내 과거 활동 이력에 대해 더 의미있는 정보인 듯하다. 작성 날짜(Date)를 기준으로 하겠다.
</a> 위에 {{ .Date }}를 추가해보자.
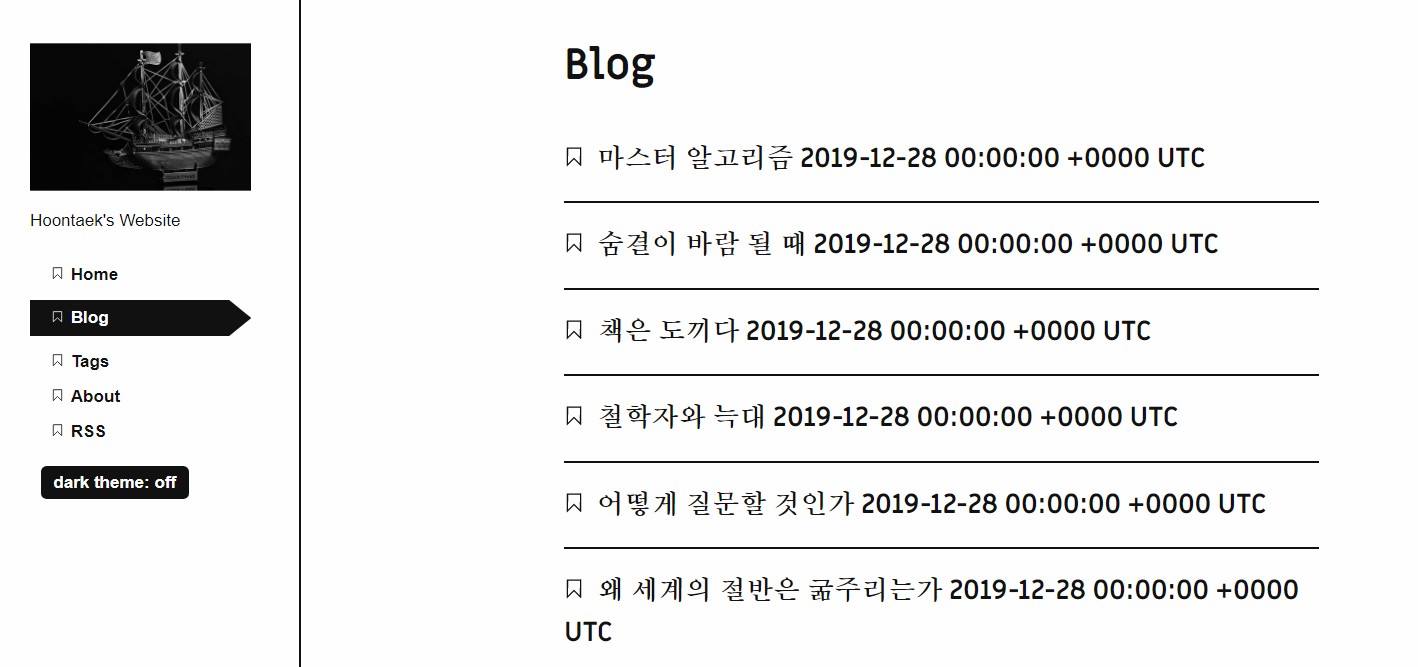
얼추 됐다. 형식을 이쁘게 바꿔보자. 아까 문서에서 .Format을 사용하라고 했었다. 여기 아래부터 쭉 템플릿이 나온다. 게시글 목록에서는 날짜까지만 표시하고, 각 게시글 안에서는 시간단위까지 기록해주자.
{{ .Date }}를 {{ .Date.Format "2006-01-02" }}로 바꿔주자. 그리고 위치를 {{ .Title }} 위로 옮겨서 날짜 먼저 표시되도록 한다. 결과는 아래와 같다.
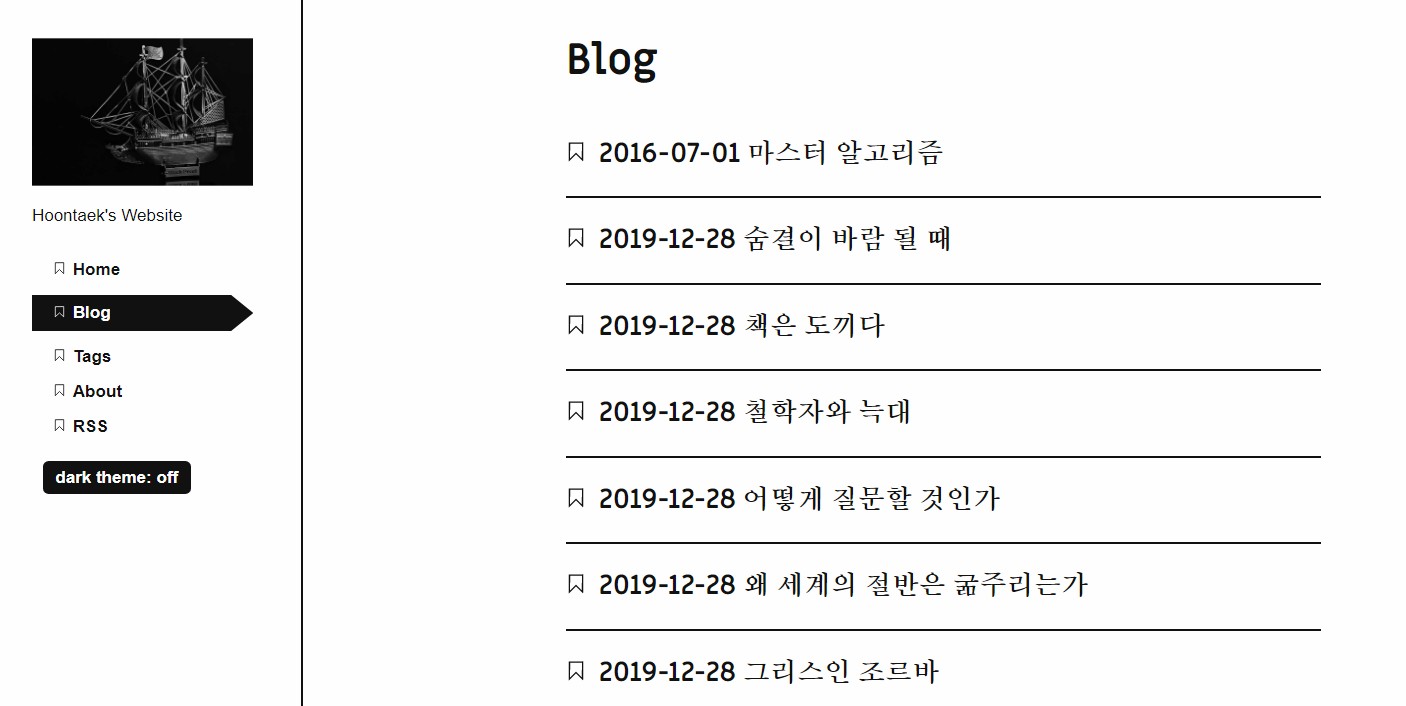
게시 날짜, 작성 날짜 추가
이제 각 게시글 내부 정보를 바꿔보자.
현재 각 게시글은 위와 같이 나온다.
내가 하려는 것은 Publish date뿐만 아니라 작성일(Date), 최종 수정일(Lastmod)을 추가하고 표현 형식을 yyyy-mm-dd hh:mm으로 바꾸는 것이다.
single.html은 아래처럼 생겼다. 어디를 바꿔야 할까.
{{ define "main" }}
  <main id="main">
    <h1>
      <svg class="bookmark-icon" aria-hidden="true" viewBox="0 0 40 50" focusable="false">
        <use xlink:href="#bookmark"></use>
      </svg>
      {{ .Title }}
    </h1>

    <div class="date">
      {{ $dateFormat := $.Site.Params.dateFormat | default "Jan 2, 2006" }}
      {{ $publishDate := .PublishDate }}
      <strong aria-hidden="true">Publish date: </strong>{{ $publishDate.Format $dateFormat }}
      {{ with .Lastmod }}
        {{ if gt . $publishDate }}
          <br>
          <strong aria-hidden="true">Last updated: </strong>{{ .Format $dateFormat }}
        {{ end }}
      {{ end }}
    </div>

    {{ with .Params.tags }}
      <div class="tags">
        <strong aria-hidden="true">Tags: </strong>
        <ul aria-label="tags">
          {{ range . }}
            <li>
              <svg class="tag-icon" aria-hidden="true" viewBox="0 0 177.16535 177.16535" focusable="false">
                <use xlink:href="#tag"></use>
              </svg>
              {{ $href := print ("tags/" | absLangURL) (. | urlize) "/" }}
              <a href="{{ $href }}">{{ . }}</a>
            </li>
          {{ end }}
        </ul>
      </div>
    {{ end }}

    {{ if ne .Params.toc false }}
      {{ partial "toc" . }}
    {{ end }}

    {{ .Content }}
  </main>
  {{ partial "disqus.html" . }}
{{ end }}
코드를 보면, <h1> 부분이 북마크+제목, <div class="date">부분이 날짜, <div class="tags"부분이 태그를 표시하는 부분인 것 같다.
그 밑에 {{ with .Lastmod }}부분에 if gt . $publishDate라는 조건이 있다. 찾아보니 gt는 html에서 greater than을 의미한다고 한다. 즉, 게시날짜보다 더 클 때만 표시되는 것 같다. 실제로 md 파일의 front matter에서 lastmod를 publishDate보다 더 늦은 날짜로 바꾸면 웹페이지에 “Last Updated"라는 항목이 추가된다. 여기에 작성 날짜(Date)도 같이 보이도록 해보자.
<div class="date">부분을 보면,
먼저 $dateFormat과 $publishDate에서 표현 형식과 어떤 변수를 참조하는지 설정해주고, 다음 줄부터 설정한 $~~를 사용해 항목을 추가하는 코드가 이어진다. {{ $publishDate.Format $dateFormat }}으로부터 이전에 선언했던 $publishDate 변수의 표현 형식을 정하기 위해 Format 메서드를 불러오고, 미리 정해 둔 형식인 $dateFormat을 이용하는 것을 볼 수 있다.
그렇다면 내가 할 것은 1) Date 변수 선언하기, 2) Date 변수 레이아웃에 추가하기, 3) $dateFormat을 시간도 표시되는 형식으로 바꾸기 - 이렇게 세 가지다.
먼저 Date변수 선언 및 추가는 아래와 같이 완료했다:
<div class="date">
  {{ $dateFormat := $.Site.Params.dateFormat | default "Jan 2, 2006" }}
  {{ $publishDate := .PublishDate }}
  {{ $Date := .Date }}
  <strong aria-hidden="true"> Created date: </strong>{{ $Date.Format $dateFormat }}
  <br>
  <strong aria-hidden="true">Publish date: </strong>{{ $publishDate.Format $dateFormat }}
  {{ with .Lastmod }}
    {{ if gt . $publishDate }}
      <br>
      <strong aria-hidden="true">Last updated: </strong>{{ .Format $dateFormat }}
    {{ end }}
  {{ end }}
</div>
세 줄(line 4-6)을 추가했다. Date를 선언해주고(4), 추가하고(5), 개행문자(6)를 사용했다.
날짜 표현 형식에 시간 추가
다음은 표현 형식이다. 현재 표현 형식은 "Jan 2, 2006"으로 돼 있는데, 여기에 시간을 추가해주자. 처음에는 기존에 있던 $dateFormat를 지워버리고 직접 변수명을 사용했다. 이 default 형식을 몇번 바꿔봐도 변하는 게 없었기 때문이다. 예를 들어 아래처럼:
<strong aria-hidden="true">Publish date: </strong>{{ $publishDate }}
하지만 이에 대해 []zwbetz에게 물어본 결과](https://discourse.gohugo.io/t/four-issues-about-the-cupper-theme-dark-button-posting-time-and-an-error/22523/4), $dateFormat 변수는 config 파일에서 설정할 수 있다고 한다. 따로 설정한 것이 없으면 single.html의 default 형식이 적용되는 방식이다. 나는 front matter의 parameter 목록을 찾아봤었는데, 헛짚은 거였다. config.yaml를 보니 params 부분에 dateFormat 변수가 있었다. 이를 아래와 같이 설정했다:
dateFormat: Mon, 02 Jan 2006 15:04 MST
위와 같이 설정한 상태에서 front matter에서 date: 2017-01-28 23:37:00+09:00(큰따옴표로 묶어도 상관 없다) 형식으로 입력하면 아래와 같은 결과가 나온다:
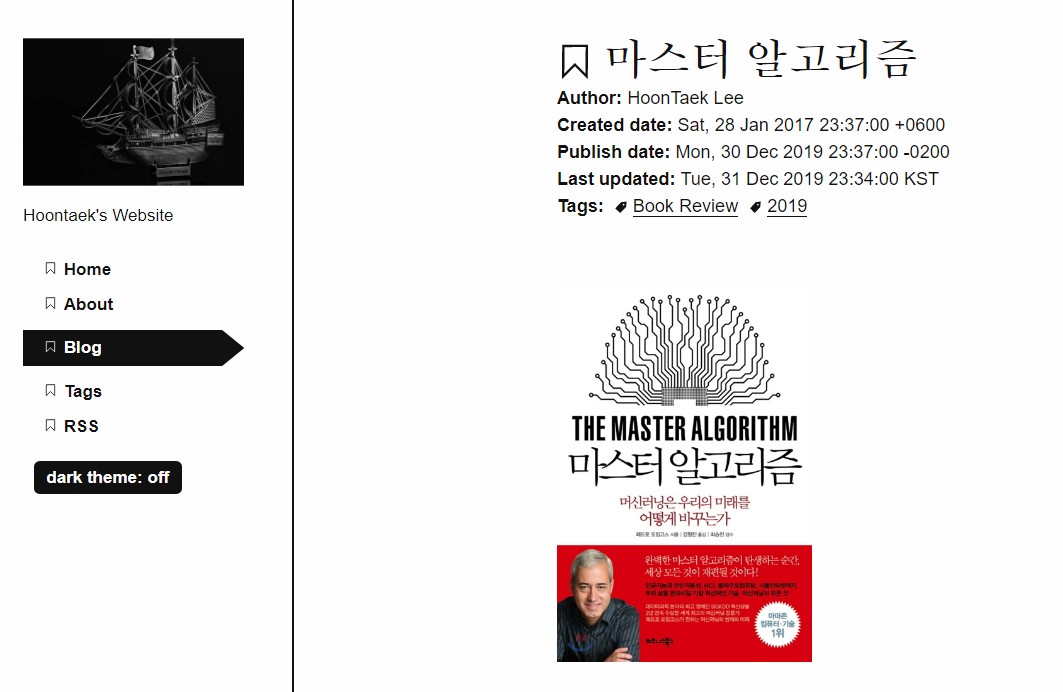
+09:00은 KST라고 잘 표현되고, +06:00, -02:00 등 다른 시간도 해당 로컬 시간 이름은 아니지만 입력한대로 잘 표현된다.
Author 추가
author 항목도 추가했다. <div class="date">부분에 아래 코드를 추가했다.
<strong aria-hidden="true"> Author: </strong>{{ .Params.author }} <br>
잘 모르겠는 건, 위 코드를 <div class="author">로 추가하면 글 제목과 Author 사이에 공백이 자동으로 삽입된다. <div> 없이 <div class="date"> 위에 만들면 글자크기가 조금 커진다. 결국은 <div class="date"> 안에 추가하게 됐다.
3. .md 파일 내 게시 날짜와 실제 날짜가 같으면 게시글이 사라지는 문제
답변: You are likely future dating your posts
내가 입력한 게시 날짜가 미래일 거라고 한다. 아마 기존에 yyyy-mm-dd까지만 표현하다보니 시간 단위로 전후 구분이 잘 안 됐던 것 같다.
publishDate를 조금 과거로 바꿔주면 해결.
4. 시간 내림차순 정렬
답변: list.html을 수정
아래 코드에서 .Reverse를 없애주면 된다고 한다.
{{ define "main" }}
  <main id="main">
    <h1>{{ .Title }}</h1>
    <ul class="patterns-list">
    {{ range .Pages.ByPublishDate.Reverse }}  <!-- 이 부분 -->
      <li>
        <h2>
          <a href="{{ .Permalink }}">
            <svg class="bookmark" aria-hidden="true" viewBox="0 0 40 50" focusable="false">
              <use xlink:href="#bookmark"></use>
            </svg>
            {{ .Title }}
          </a>
        </h2>
      </li>
    {{ end }}
    </ul>
  </main>
{{ end }}
후기
- 글쓰는 데만 집중하고 이런 코드 찾아보는 일 안 하려고 Medium을 선택했었는데, 결국은 이런 짓을 하고 있다.
- 하지만 지금과 같은 노력을 들이지 않으면 내 마음에 드는 딱 맞는 테마를 찾기란 쉽지 않다. 아마 여러 테마를 옮겨다니면서 최선의 차선책을 찾고 있지 않았을까.
- Time 형식 지정하는 게 어려웠다. 결국 내가 원하는 형식으로는 하지 못 했고, 임시로 비슷하게 설정해뒀다.
UTC+08:00처럼 표현하려면 어떻게 해야 할까.- 마지막 수정할 때마다
.mdfront matter의 날짜 및 시간이 자동으로 그때 시간으로 변경되도록 하려면 어떻게 해야 할까. - 일단은 이런 노력 덕분에
Cupper테마를 쭉 사용할 수 있게 됐다. 그리고 앞으로 이 짓을 또 할 때 지금의 경험과 기록이 큰 도움이 되겠지.